Friday, April 16, 2010

Eat Your Flowers


In Chicago I don't declare it Springtime until I can see full-fledged leaves unfurling on the occasional tree. That being said, I think we've finally arrived to that time here.  I thought it might be a good opportunity, then, to do a little four-part series on flowers in food.  This is mostly just an excuse for me to buy roses for myself, perhaps, and to take pictures loaded with petal colors.  What can I say?  I'm a girl.


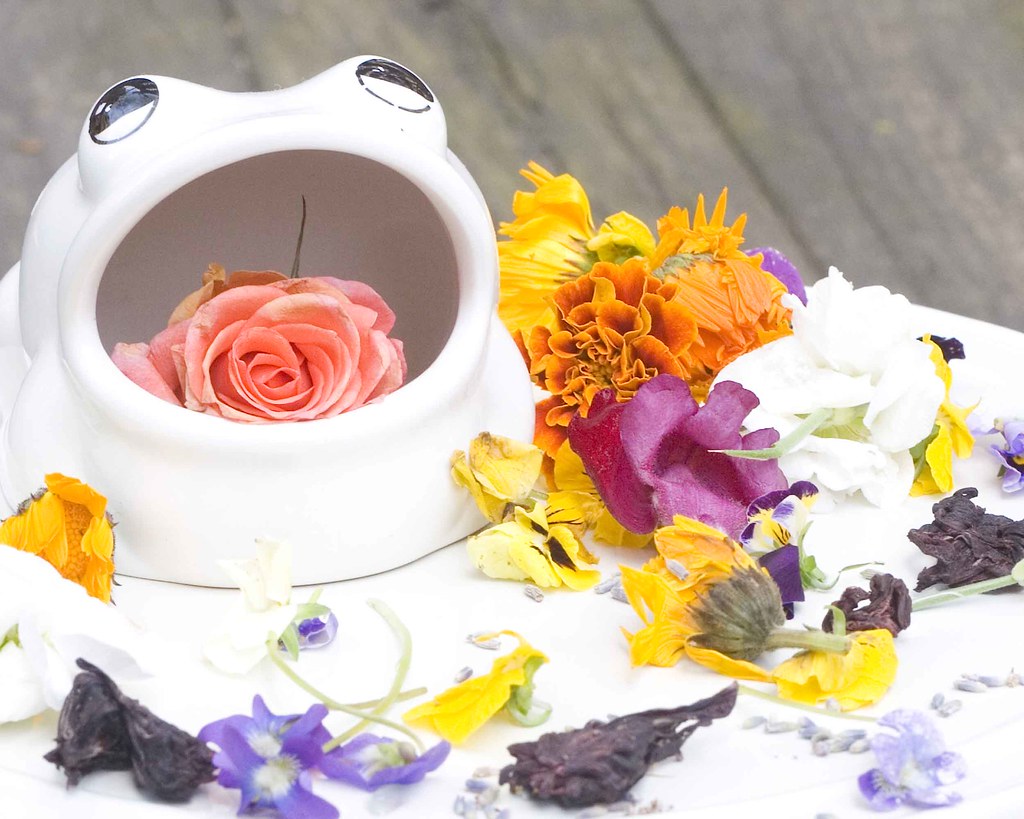
I'm not going to tell you what all of the recipes for this series are going to be, but I can tell you that they will include all of the flowers seen in the below photo, with each focusing on one or two in particular: Hibiscus, Violet, Rose, and Lavender were chosen to be the main players. Two of the dishes, including this first one, are savory.  The other two are desserts.


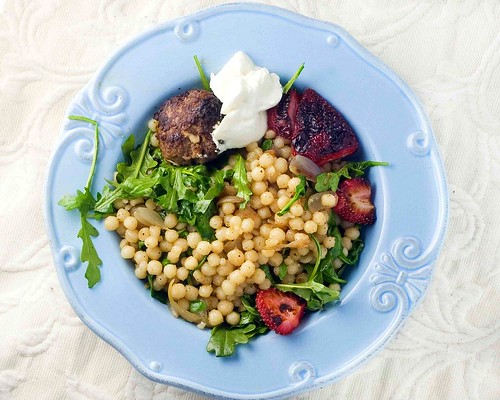
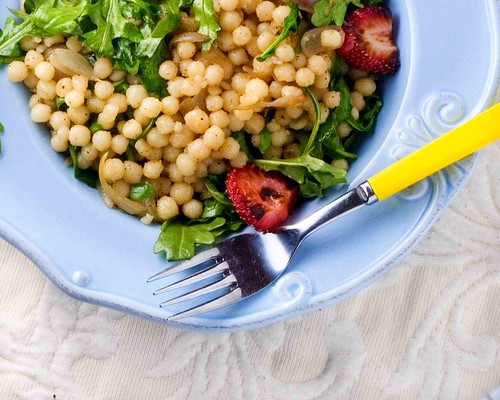
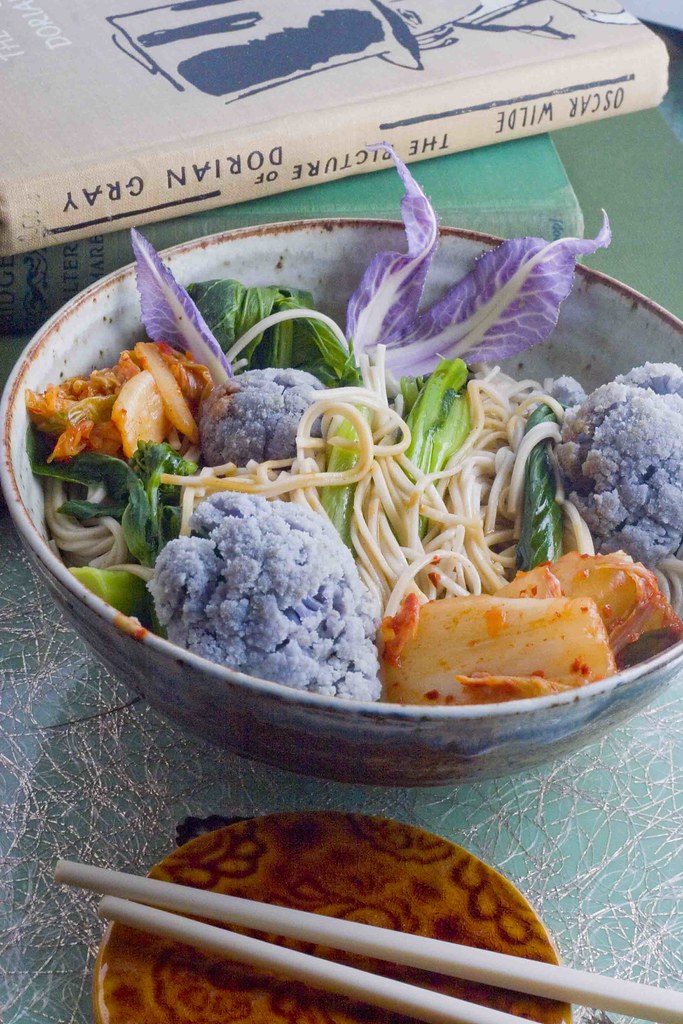
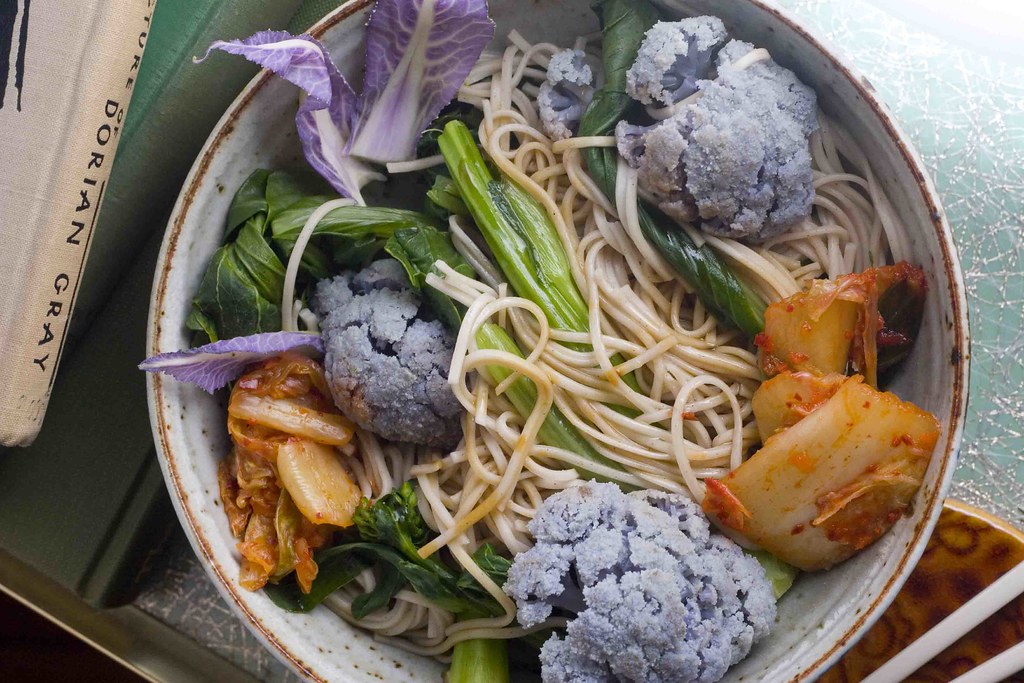
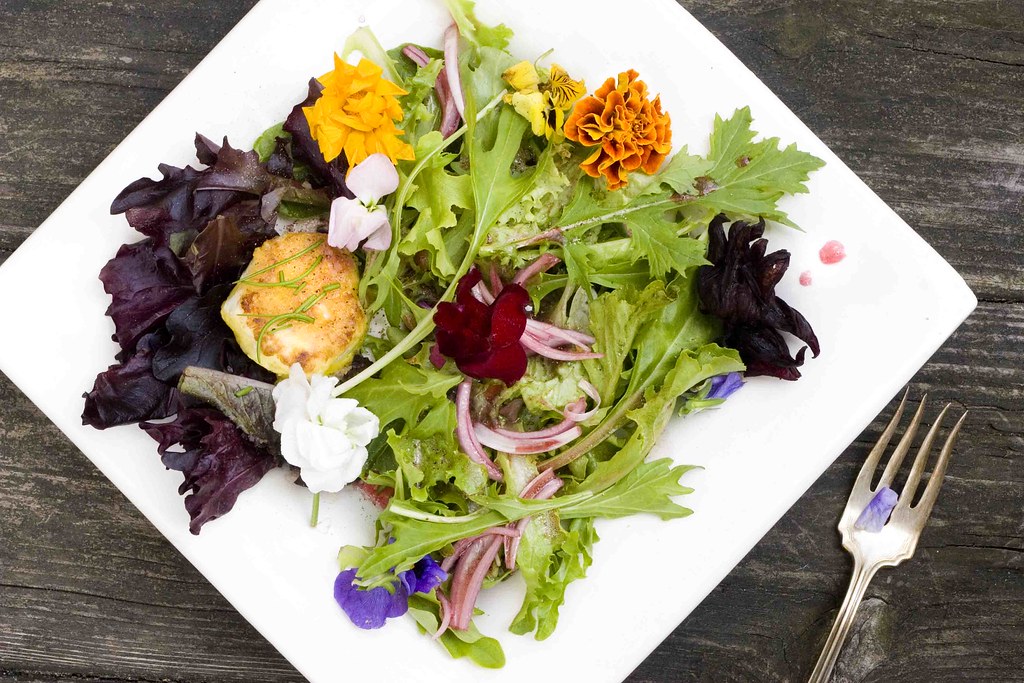
This first dish feels a little like an exception when you look at the pictures since I went a little wild buying a confetti pack of edible flowers of a dozen varieties to sprinkle on the finished salad.  The focus is supposed to be on the hibiscus flower vinaigrette, but I will admit that in the plated finish it's the look of a sea of wildflowers on the greens that steal the eye away from the deep plum-colored dressing.


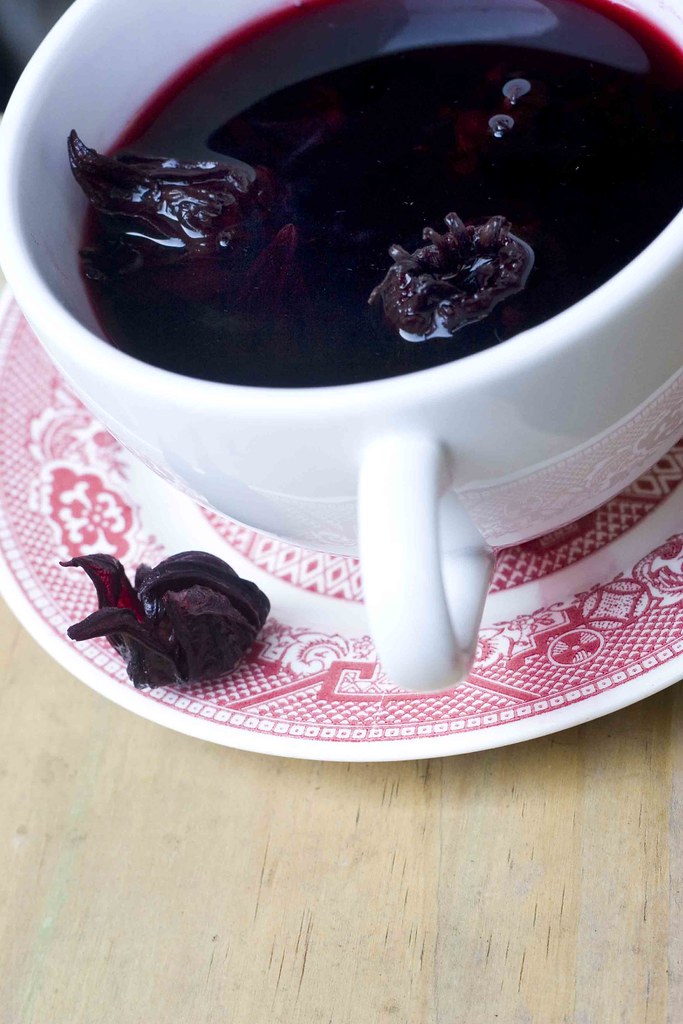
Still, when it comes to flavor, the hibiscus' role reigns supreme.  There is a wonderful tart, fruitiness to these flowers that makes their tea perfect for dressing a salad, which is how I did it - by making a tea out of the dried flowers.  I found the flowers in a Persian shop near my home, but you could also use dry tea blends or hibiscus juice, even, which is available in health food stores, etc.  Just adjust things like honey or vinegar according to your tastes.


If you'd like to use the flowers, which are great for all kinds of things, like this amazing jam from Sanjana at KO Rasoi, here is a good source for them at a decent price.

I served this dressing over fresh organic mesclun mix with goat cheese croquettes (just goat cheese mixed with fresh chives and dredged in egg/flour mixture before a quick pan-fry) and mixed edible flowers.  The flowers should be labeled "edible" in florists or found in the fresh herb section of the grocers, and are grown without harmful pesticides.  If bought in packs, they often include certain varieties of chive flowers, marigolds, nasturtiums, etc.  They all have their own flavors that range from "nutty" to "citrusy", but tend to be subtle in flavor. 

Next week I'll share another fun recipe including flowers, I hope you'll stop by!

Recipe: Hibiscus Flower Vinaigrette


What you need to get...

1/2 cup hibiscus flowers
8 oz boiling water (to make a strong hibiscus tea)
3/4 cups olive oil
2 tablespoons thin-sliced shallots
Small handful of fresh tarragon, chopped
Small nob of fresh ginger, grated or minced very fine
1 tablespoon sherry vinegar (red wine vinegar also works - if using balsamic, omit honey)
1 tablespoon lime juice
1 tablespoon honey
1 teaspoon kosher/sea salt
Cracked pepper

What to do with it all...

Add your boiling water to your hibiscus flowers and allow to steep for 10 mins. Remove flowers and allow tea to cool to room temperature.

In a medium non metal bowl, combine the rest of your ingredients except the olive oil and allow them to "mingle" while the tea cools.  Once tea is cooled, whisk in.  Whisk in olive oil, adding in a steady stream until incorporated.  Store in refrigerator for at least an hour before use.

Makes 2 cups of dressing

Saturday, April 10, 2010

Moss Cupcakes You Say?? I Do!!!


Ok, I know this is a sort of ridiculous thing to be posting, but I don't really care.  The idea popped into my head and it just wouldn't go away... Cupcakes. Made to look like moss balls.  "You know, those moss balls you see sold at home decor places."  I said, explaining the idea to Jason.  "What?  Like, the kind you put in your closet?" he replied.  He was driving in his car and on a headset, so there was a good deal of static on the line.  Still, I was pretty sure he said "closet" and I was really confused.  "No, what?  Why would you put cupcakes in the closet?" I said, shaking my head (to no one).  "I was going to ask the same thing!" was the reply.  "And since when are moth balls GREEN?".  "OH!  No, not MOTH balls, MOSS balls..."  I said, almost rolling my eyes and then realizing "moth balls" might actually have made more sense.  "Um, oh... well... I'm sure it'll turn out great, sweetie... Moss balls...". 


I could picture him nodding his head on the other side of the phone.  Convincing himself, mentally, that he was not dating a crazy person.  Jason really is so supportive.  Even when my suggestions scare and confound him... and everyone else around me.  But it's okay if people are worried, because in my head this stuff makes a weird kind of sense. Sometimes my little brain says "You know what would be fun?  Making some cake balls that look like sheep."  And off the couch I go, zombie-like, to the kitchen to see if I have any Pocky around I can use for legs.


Most of the time people come around to my way of thinking once they see the results.  That, or they're too frightened to say otherwise.  "I LOVE the cheese snowmen, really!" they say, grabbing the tray I bring to their party... smiling a little too widely as they make a mental note not to invite me to their next one.  That's what I imagine.  But I'm hoping they will amuse someone.  Moss may not be the most exciting substance to want on a dessert.  It's not cute.  Or even logical.  But I had a surprising amount of fun making them, and I think they're perfect for Spring, really.  REALLY.  They're pretty tasty, too, when you combine the chocolate bases with the minty green tops and then coat them with more minty chocolate cake crumbs.  


By the way, this recipe asks you to buy mint oil to flavor it.  There's no reason why you should have to listen to that, though.  I think these would work perfectly well if you chopped up a handful of chocolate mints to put in the cupcake base and called it a day.  I wouldn't be a good Chicagoan if I didn't ask that those chocolate mints be the classic Frango Mints from the old Marshall Fields stores (now Macy's, boo) if you can help it.  But really anything minty would work.  Use your imagination!  I do... even when it tells me to make odd things like this...


Recipe: Chocolate Mint Moss Cupcakes

Makes 16 cupcakes

For the cupcakes... (adapted from Joy of Baking)
1/2 cup cocoa powder (Dutch-processed preferred)
1 cup boiling hot water
1 1/3 cups all purpose flour
2 teaspoons baking powder
1/2 cup unsalted butter, softened
1/2 teaspoon salt
1 cup granulated sugar
2 large eggs
1 teaspoon vanilla extract
2 teaspoons mint oil

Friday, March 26, 2010

Another food contest entry! Tea cakes for KO Rasoi!

I'd like to say it seems to be the season for food blog contests right now, but I think it's more of a matter of contests that have piqued my interest enough to go thru all the effort I inflict on myself in making my entries.  The creative pondering, flustered experimenting and the occasional mini-inferno I run into while submitting posts means it's gotta be good for me to do it.  When I saw Sanjana's contest over at KO Rasoi, I knew it was time to pull out the fire extinguisher again and get baking.

Sanjana's contest asked that you create a dish inspired by a super adorable charm bracelet...

 
The bracelet is almost as adorable as the cool blue sparkly nail polish you can see she's wearing in the picture... see it now?  Other than the polish, the thing that caught my eye was the little white and blue delft style china cup charm.  Seeing as it's a roughly "tea" themed bracelet (though I don't remember the last time I had a margarita at tea, sadly), I decided I'd make something I've always wanted to make - petit fours.


What I didn't realize is that "petit four" is actually a French phrase meaning "insanely difficult" or "frustrating to the point of drinking a 3 glasses of wine rapidly, on an empty stomach because these 'petit fours' refuse to provide you with something suitable to feed yourself with."  Or something roughly like that.


You see, I wanted these to be not just any petit fours.  Oh, no, that's just too dull (wise) for me.  I wanted to make the sort of cakes that you could write on with edible marker to create patterns - in this case patterns that match your tea service.  This meant coating them with something that dried hard enough to accomplish this.  Typical petit four icing is a little too fragile for this, I figured.  I first tried rolling on some of my trusty recipe for marshmallow fondant, but I didn't like the way it draped.  Next my mind turned to royal icing.  Royal icing was something I vaguely remembered using on sugar cookies my mother made when I was little, but I always remembered liking them better without it.  Despite that and the fact most recipes I read included warnings like "Use immediately or it will harden indefinitely" and "Good as a glue, but not pleasant to flavor with" I was not to be deterred.


An hour later I had coated a beautiful set of little chocolate cakes in a gloppy, uneven mess of what amounted to Elmer's glue... and it tasted about the same.  I honestly don't know if it was my recipes (I tried 2), the cook or a combination that did me in, but in the end I tossed the whole collection of useless lumps into the trash.  Enter wine.


The next day I did some more research and turns out it's not a great idea to coat entire cakes with royal icing.  I also realized I needed a denser cake - like a gĂ©noise or sponge.  Who knew?  Lots of people do, as my reading was leading me to understand.  Obviously I'm still new at this cake thing.  In the end the tea cakes shown in the pictures have a combination of petit four icing with a top piece of fondant.  Which works, but I think it's a bit too labor-intensive for such little cakes, don't you?  In fact, when Jason saw these and then looked at the sample I kept of the strictly fondant version, he said he liked the fondant version better.  It was my drive for perfectly smooth shapes that made me wish for the perfect icing.  The more I thought about it, the more I realized the fondant ones didn't look too shabby, I liked their little pillow-y edges... and they certainly were less conducive to reducing me to near tears.  Less tears = win in my book any day. 

How to Make: Blood Orange and Chocolate Petit Fours


Since I take the cake recipe directly from the Joy of Baking site, I'm not going to reproduce it here.  It's adapted from the Cake Queen: Rose Levy , so you know it's good.  The link can be found below...

Recipe for Chocolate Sponge Cake on Joy of Baking

Once you've made your cake and allowed it to cool, cut it into desired shapes using cutters or a serrated knife.  You'll want and even number of every shape since you'll fill w/frosting and stacking in doubles...

To make the Blood Orange Frosting...

 2 cups confectioners sugar
1/2 cup unsalted butter (softened)
1/2 teaspoon vanilla extract
Juice and zest of 1 large blood orange
Orange food coloring (if desired)

With a hand or electric mixer, cream the butter until smooth.  Add vanilla and the zest and blend.  Gradually beat in sugar.  Add the blood orange juice and whip on high until fluffy.  You may add a drop of orange food coloring if you like.

For the icing...

Approx 1 cup by volume of marshmallow fondant
Various edible marker colors

To put it all together...

Roll out your fondant to an 1/8 inch thickness and cut into shapes that allow you to cover your stacked cake shapes.


Spread a layer of blood orange frosting between two layers of sponge cake.  Frost the outside with a thin crumb coating of frosting to allow the fondant to adhere evenly.

Drape your cakes with fondant pieces and smooth tops

Using your food-coloring pens, draw patterns based on your tea cups on the tops of your cakes.  Done!

Tuesday, March 16, 2010

Inspired by Renoir: Roasted strawberry/arugula couscous + Greek lamb loukaniko

If you've never checked out Feasting On Art, you should do so immediately.  It really is one of the most inspired food blogs you'll find.  So when it's creator, Megan Fizell, posted a recipe contest, I was SO there.  The challenge?  To create a recipe inspired by Renoir's still life titled, very appropriately, Strawberries.  Creating recipes like this is the theme of Megan's blog and what makes it so wonderfully unique is her fantastic imagination.  I decided if I were to participate, I'd have to pull out all stops and leave caution at the door.  Thankfully, that's my favorite way to cook...

The inspiration: Renoir's Strawberries

I spent some time thinking about not just this painting, but the life of Renoir at the time of painting it, and the man himself.  This piece was done near the end of his career, a time when he abandoned elaborate design and focused on the simple and ruffled beauty of natural still lifes of roses and fruit.  There's a rustic and lush brightness in Strawberries.  Something in it makes me think of  a man that was content with his accomplishments and diving in to the simple pleasures within reach for us all, every day.

The PLC version of Strawberries

For me, the mention of Renoir recalls my Greek grandfather.  He loved the impressionists, as he loved good food.  He'd lived in Paris for years, worked in kitchens and as an apprentice tailor.  I remember him drawing shaky renditions of art he'd seen, then in his 80s, on scraps of paper and explained in frustrated broken English.  I also remember him bringing home loukaniko - a Greek sausage made with fennel seeds and orange rind.  So I thought making some for this would be perfect, made with ground lamb.  Seeing as I wanted to keep this simple, I wouldn't be going thru a full sausage-making process, however.  Just some simple patties seasoned the right way would do.


Of course, the loukaniko patties by themselves really don't show much Impressionist Era inspiration (brown lumps, not really art-worthy). I used couscous because it reminds me of the daubs of paint impressionists use, and of the pointillism works of the time.  I added the strawberries, roasted first to give them smokiness, and wild arugula to give it a nice peppery boost.  I used a Lebanese couscous I found at a grocer - it's the largest I've ever seen and I just couldn't pass it up.  Israeli couscous would work just as well, I'm sure, and be easier to find.

Recipe: Renoir's Roasted Strawberry and Arugula Couscous with Lamb Loukaniko 


What you need to get...

For the loukaniko patties...
1 pound ground lamb (other ground meats work as well)
3 cloves of garlic, crushed
The zest of one orange
A splash of red wine (1 tablespoon or so)
Red pepper flakes (to taste)
1/8 teaspoon salt
1/2 teaspoon allspice
1/2 teaspoon cinnamon
1 teaspoon fennel seeds

For the couscous...
2 cups cooked Israeli couscous
1/2 cup shallots, sliced
2 cups wild arugula
1 cup hulled and halved strawberries
Juice of half a lemon
Salt and pepper to taste

On the side... Greek-style yogurt

What to do with it all...

For the loukaniko, combine all the ingredients and form patties or links depending on your preference
I recommend broiling or pan frying on high heat (or grilling if available) until desired done-ness.  Set aside, loosely covered in tin foil until ready to use.  Reserve meat juice and fat to cook shallots. 

For the couscous, cook shallots on low heat either in meat juices from loukaniko or olive oil until translucent (4 -6 minutes)
Meanwhile, scatter strawberries in a cookie sheet with a lip, or onto tin foil (create a lip to catch juices) and place under broiler on highest setting.  Watch strawberries carefully and remove as soon as there is some blackening.  The time varies widely based on your broiler.  Remove and set aside until plating your finished dish.
When shallots are translucent, add your cooked couscous, arugula, lemon juice and salt and pepper to taste.  Turn burner up to medium and toss.  Cook until heated thoroughly and arugula is slightly wilted (a couple of minutes).

Plate cous cous, top with loukaniko, strawberries and a dollop of yogurt!

Friday, March 12, 2010

On being away...

I've rewritten this post thirty times, nearly literally, and have realized the best way to say it, is just to say it.  I've been away from Peas Love Carrots because my father passed away, suddenly, early this month.  I rushed off to Enid, Oklahoma where he and some of my family live and have just recently returned from there.  I thought about not mentioning it on the blog, but well, it felt sort of wrong not to.
I don't intend this to be maudlin in any way.  The sadness I feel is mixed with the joy of memories of Dad.  Which is how I feel it has to be.  The years have been stripped away from thought and I am finding comfort in childhood recollection.  After hearing the news he was gone, several memories rushed immediately to mind that have not left it since.  One was of his large bristly mustache, which was an eternal source of amusement for me as a little girl.  The mustache had a personality all it's own and I would watch with curiosity as he groomed it every day with a little comb that reminded me of the one I used on my Barbie's hair.  It would tickle my cheek with every kiss goodnight.  It would twitch, Charlie Chaplin-style, whenever he knew I was watching him, just because he knew it would make me laugh.  As I would also giggle whenever he ate, as some crumb of food would inevitably get caught up in it in the process.

Another memory is of his spontaneous hijinks in the kitchen, whenever Mom would let him break into her domain.  My mother made food that made you know, in your bones, you were well cared for.  The sort that are comforting touchstones that in adulthood serve as Proust's Madeleine in their ability to whisk me back a decade ago to her kitchen as I now cook them.  My father, however, was a mad wizard at the stove.  If the notion popped into his head to cook, the best thing to do was to rush to the kitchen doorway and watch the fun.  There were no sweet moments of helping chop or stir like there was with Mom.  Just a flurry of flour, the rattling of odd pans and in the end, fantastical dishes I had never knew existed.  They were most often inspired by his Southern-American roots, though I don't know how much of that I realized at the time.  This meant Louisiana crab cakes stacked in high towers and made with mascarpone, Ă©touffĂ©e with olives and saffron, and once, as I watched in awe, he stuffed apples with golden raisins and brown sugar and then, with his long fingers wrapped them whole in pastry dough to bake.

I now know these are called Apple Dumplings and the recipe is rather common in the South.  But to me they will always be magic, and they will always remind me of Dad.  Last night I had my first real desire to cook something since returning from Oklahoma.  The choice for me was clear.  It would be Apple Dumplings.  I realize I am truly biased here, but I have to tell you that this is the best version you are apt to taste in your life.  It's rich without being cloyingly sweet, and fun and easy to make, though you'll look like a gourmand when it's served at the table.  Please trust me on the crème fraĂ®che, and leave it unsweetened for your first attempt, at least.  It's nutty and perfectly lush with the apple and crusty pastry.

Just remember to check your mustache, should you have one, for crumbs while rapturously enjoying this... I can nearly guarantee you you will have some.


Recipe: Apple dumplings with cardamom and crème fraîche


What you need to get..

For the dumpling base...
4 Granny Smith or other tart apple, peeled and cored, but keep whole
4 raw flaky biscuit dough rounds (premade and found in cans in refrigerated sections in the US) or 1 sheet puff pastry dough (make it yourself, or buy frozen and thaw)

For the filling...
4 tablespoons light brown sugar
1/8 teaspoon ground cardamom
1/4 teaspoon cinnamon
1/8 teaspoon ground ginger
2 tablespoons golden raisins
2 tablespoons unsalted pistachios (optional)

Other ingredients...
1 egg, beaten, for sealing/glazing dough
White granulated sugar for dusting dumpling tops
AP flour for rolling biscuit rounds
Unsweetened crème fraîche for serving OR unsweetened whipped cream, or cream lightly sweetened w/honey

What to do with it all...

Preheat oven to 400˚F.

Place peeled/cored apples in a microwave safe dish and microwave on 50% power until fork-tender (5 - 7 minutes for most).  You can also bake for 10 - 20 mins at 400˚F lightly covered in tin foil for same results.  Once tender, remove to refrigerator to cool.

While your apples are cooling, mix the filling ingredients and set aside.

Roll out each biscuit to about a 7 - 8 inch round (depending on the size of your apples) on a floured surface.  Place one apple on each round and fill each with 1/4 of the filling mixture.

Brush beaten egg on dough around apple, then bring up the sides to wrap the apple.  Seal and finish with a twist at the top of the apple.  Brush outside of dumpling with a little more egg, then dust with white sugar.

Place your sealed dumplings on a baking sheet, and bake for 15 - 18 minutes, or until golden.  Serve with crème fraĂ®che and a dusting of cinnamon.

Sunday, February 28, 2010

Orange Blossom and Rosewater Cupcakes


Having spent so much of the last few weeks in front of a computer, I am just itching to get back to the kitchen.  What odd is, where I formerly would focus mainly on cooking, I recently have had a pull towards baking.  I think I have this blog to thank for that.  My sweet tooth is a little under-active,  so I've never really had too much cause to bake before (unless it's savory).  Being able to share baking on Peas Love Carrots changes everything, however.  I always had an interest in cake decorating, and now I'm free to play with it!


I've been wanting to do something with flower waters, where you know what flavors you have by the type of flower on the top.  I modeled the flowers after the beautiful carvings I've seen all around Mexico, so often featuring the vibrant blues and folks-y shapes. I love them!


Finding myself with an actual free day yesterday, I decided to dive right in... and make fondant!  Fondant is really one of the coolest, most versatile cake "frosting" out there, but it's usually not terribly tasty.  Pre-made brands, like Wilton, give you convenience, but it tastes a little... off.  Marshmallow fondant is easy to make, and tastes pretty good, too.


For a large batch (you can refrigerate unused portions for months) you'll need...

1 16 ounce bag on mini marshmallows
2-4 tablespoons of water
2 pounds (one standard bag) of powdered sugar
Vegetable shortening to coat hands and finished fondant
Cornstarch for rolling

Place marshmallows in largest bowl that fits in your microwave and toss along with 2 tablespoons water.  Microwave on high for 30 seconds, remove and stir.  Repeat until marshmallows are completely melted and almost soupy (about 2.5 minutes).

With a wooden spoon (it's very hot, don't touch it with bare hands yet), begin folding in powdered sugar at about 1 cup at a time.  You may not use all the of sugar.  You can add a flavor oil now if you like, such as orange or almond.  Use the spoon as much as possible to incorporate the mixture, then grease hand liberally with shortening.  Test to make sure the mixture is cool enough to handle, then begin kneading.  I suggest doing this right in the bowl, but you can also turn the dough out onto a surface, just grease it first!  Knead until smooth and pulls into elastic ribbons (about 8 minutes).  If it tears easily, it's too dry.  Add a teaspoon of water at a time, kneading in between, until desired elasticity is achieved.

Divide out the portion of fondant you need, and coat the remain amount with a thin layer of shortening.  Double-wrap in plastic and keep in a zip top bag with as little air in it as possible.  It can be stored in the refrigerator for several months.  If it becomes to dry, microwave for 5 - 10 seconds.  Be careful, it may be hot after this.

Doesn't it sort of look like a little baby bird waiting to be fed?  Didn't notice it until the picture...

To roll fondant: Sprinkle a small amount of cornstarch as you would flour and roll out to desired thinness.


To color fondant: I find it easiest to color it after making it, as there's often several colors you want one batch to be.  Also, over time colors can change/darken so coloring when needed is best.  Add a couple of drops of good gel food coloring to the dough at a time, kneading and assessing the color.  Note: I suggest wearing food-grade gloves while doing this, as good food colors can stain your hands.  If you don't use them, scrubbing hands with exfoliating products should remove dye color with a little patience.

To make light blue green: use a 2-1 ratio of blue to green food color
To make orange: 2-1 ratio of red to yellow food color
To make green: 4-1 ratio of green to brown food color(this makes a more olive green - you can just use green color, too)

To make the cupcakes (recipe adapted from King Arthur Flour basic golden vanilla)...


24 medium cupcakes


What you need...
2 cups sugar
3 1/4 cups all-purpose flour
2 1/2 teaspoons baking powder
1 teaspoon salt
1/4 cup unsalted butter (softened)
4 large eggs

To make it orange blossom-flavored
Add 1 tablespoon orange blossom water
Zest of one orange
1 teaspoon powdered ginger

To make it rosewater-flavored 
Add 1 tablespoons rosewater
1 teaspoon cloves
2 teaspoons cinnamon

(to make half and half, just divide the batter and halve the flavoring)

Preheat oven to 350 degrees Fahrenheit.  Line cupcake tins with paper.

In a large mixing bowl, whisk together sugar, flour, baking powder and salt.

Add buter and beat with hand or stand mixer on low until it resembles sand.

Combine milk and desired flower flavorings.  Beat on low for 30 seconds then on medium for 30 seconds, scraping the sides.

With mixer still on low, add eggs, one at a time.  Scrape bowl again and beat another 30 seconds on medium high.

Transfer batter to cupcake tins - a little more than 1/4 cupfuls each (you want them to have big tops).  To just a little under the cupcake tin rims

Bake for 23 - 25 minutes or until a toothpick comes out clean.

Remove and allow to cool before removing from pans.

To decorate your cupcakes you'll need...

Buttercream frosting to coat cupcake tops before fondant, and to secure flowers (I use premade with a little honey beat in for better flavor)
Light blue fondant for tops
White fondant to make orange blossoms
Golden dragees for the orange blossom centers
Edible markers (optional) to add detail to leaves and roses
Various colored fondants for roses


Tips for making blue tops...

Divide your dough into the number of cupcakes you have, and roll those sections into balls to easily make rounds

Coat the tops with a small amount of buttercream to act as glue, and to fill in or balance out the top (add more to one side if it's lopsided)

After adding the rolled fondant top, trim the edges of the round so that it just wraps under the lip of the cupcake top - tuck under and smooth as you go

Cut a conical hole in the center to attach roses - add a small amount of buttercream to the "stem", then fit it into the hole

Secure all leaves and flowers with a tiny amount of buttercream and a toothpick or knife


Tips for making roses...


Start with a small strip and roll a rosebud, then hand form individual petals to attach at the "stem"

Round and smooth the edges as you go

Use a little yellow and red food safe marker to add detail to roses - then blot with damp paper towel to blend

Tips for making the orange blossoms...


Find a picuture of blossoms to work off of, and roll out your white fondant and cut free-hand to size

Alternately, use a mini cookie cutter that is star or starfish-shaped like this one

Attach dragees to centers with a tiny amount of buttercream on a toothpick

Tips for making leaves

Roll out green fondant and find pictures of leaves you'd like to make, or use various cutters

Use green edible marker to make leaf veins - blot with damp paper towel to blend

Wednesday, February 24, 2010

Swamp Dinner - for when I'm swamped with tasks, that is...


Have you missed me?  You might've noticed, or maybe not (even worse!) that it's been slim pickins' for posts from me this month... and just a month after I promised more frequent posting.  Tsk tsk on me.  [Warning: excuse follows] It's a very busy time at the company I work for, which just so happens to coincide with an uptick in the myriad of things due for classes this semester.  My hands have begun to take on a smooth, powdery feeling from handling so much paper as I move it from one pile.. to another pile... to the waste bin or, if they're lucky, the rest home where all good papers go to die: a crisp manila folder.

I know I shouldn't complain. I will admit to smiling to myself, even, as I careen around Chicago from one train to the next - shaking my mittens at the fresh sheet of snow that hides the slick ice beneath.  It's ridiculous in a way.  This is temporary, this wandering around in a fog of bibliographies and spreadsheets fueled with a steady diet of bad coffee.  Work will slow up, as will school.   And there are always good things to remember.  Basic things like love, and warm socks... and yes, food.  Always food.

So what do I eat during these times?  Lots of quick stuff, obviously.  Things that don't require much thought, certainly.  Things that aren't apt to be so heavy as to make me fall asleep onto my laptop, definitely.  Basically, that means a "if you can boil water" meal.   And boil water is exactly what I do.  That means rice/pasta/noodles + veggies + sauce/flavorings.  Normally this is great tasting, quick... but not exactly picture-worthy or recipe-worthy.  Last night, however, I looked down at my bowl, blurry-eyed with reading, and decided to get out my camera...

I am not going to write a recipe for this, because it's meant for the sorts of nights when recipes are not to be fussed with.  And frankly, I'm just too tired for it, my dear people, and I'm afraid it would come out in APA style (horrible academic joke).  I'll just spare you this and tell you the very simple steps...
  1. Put water on boil (or broth if you're feeling industrious)
  2. Add soba noodles
  3. Add vegetables - in this case, Chinese broccoli and some purple cauliflower I found at the market
  4. Boil on until the noodles are done (veggies will comply and be ready at the same time)
  5. Add flavor - I used good soy sauce, sesame oil and kimchi
It's so pretty, isn't it? 

Now *book spine cracking*, I'm going to get back to it...

Thursday, February 18, 2010

Memories of sunshine - Strawberry Mojito Cookies


Every summer I think about the previous winter and its shivering and bundled layers and it seems like an odd novelty. Boots?  Hats and mittens?  Silliness.  And that's because I forget just how cold 20 degrees Fahrenheit can be... or 10... or zero.  From inside a sundress, it seems impossible to think of 2 pairs of socks.  But nonetheless here we are, peeking our heads out of our wool and triple-insulated down igloos at each other on the streets with watery, wind-struck eyes.  And now it seems impossible to think of seeing people with bare toes on the sidewalks.  The sign at the old diner boasting about "air conditioned" seating sounds odd, like maybe in 1956 they needed that sort of thing, but certainly not these days.  Buried under a crust of Chicago snow, summer seems like decades ago right now.


Which is why I needed to make these cookies.  Not simply because having an excuse to turn the oven on in my drafty kitchen, but because they're Mojito-inspired.  And Mojitos are the sort of thing you drink when you're outside in weather that doesn't require you have some purpose to be outside, other than to "enjoy" it. 

So to keep alive the notion of sunshine on bare skin, and kind breezes... even sunburns and humidity-frizz-hair, I had to make these.  To remind me that the boots will go back in the closet for the next half of the year, when I'll stumble across them while searching for a rogue sandal and they will seem alien to that version of me: a relic, and I'll marvel at how precious they seemed just a few months before.

Recipe: Goodbye Winter Strawberry Mojito Cookies


For the cookies...
1/2 pound unsalted butter (softened)
2 1/3 cups AP flour
2/3 cup granulated sugar
1 large egg (room-temperature is best)
2 teaspoons vanilla extract
Zest of 1 lime
1/2 teaspoon cinnamon
1/4 teaspoon baking powder
1/8 teaspoon salt

For the glaze...
1 pint fresh strawberries
1/2 cup sugar
1/4 cup white rum
1/2 cup water
Small handful fresh mint leaves, minced fine

What to do with it all...
Cookies: Beat together butter and sugar on medium speed until light and fluffy.  Add all other ingredients except flour and beat until well combined.  Reduce mixer to low and add flour slowly until well combined.  Divide dough in half and wrap and put into fridge to chill for 20 minutes.

Preheat oven to 350 degrees.  Remove one half and place on a well-floured rolling surface.  Roll out to 1/4 inch thickness.  Cut out cookies with about a 3-inch cutter (or use a tin can!) and place on a cookie sheet lined with parchment or a silicone mat 1 inch apart.  Bake on mid or upper rack for 6 - 8 minutes or until golden.  Repeat with second half of dough.  Set aside cookies to cool.

Glaze: In a medium saucepan, heat all ingredients except mint on medium, stirring occasionally until strawberries are soft and giving off color into liquid.  If there is too little liquid, just add a little more water.  Puree mixture with emulsion blender or standard blender and return to saucepan.  Simmer until thick.  Allow to cool slightly, then stir in your minced mint.  Add a tea spoon's worth of glaze to each cookie and spread until shiny and lovely.

Finish with powdered sugar if desired.

Hello Spring.  Oh how I missed you.

Tuesday, February 9, 2010

I Love You Berry Much Creme Brulee

Have I mentioned before how much I love rummaging, Truffle Pig style, thru the bins at the resale and antique stores that dot my neighborhood?  Every now and then I scout (er, snout?) out a dusty pair of Italian riding boots or an old printer drawer richly patina'd from a hundred inky hands.  Now that I am a food blogger (hurrah!) I'm more apt to linger in the housewares areas, too.  This is where I recently found this humble little heart ramekin.  Similar ones are available all over the place, of course, and I think everyone should have one.  Even if it isn't 60 cents (like mine, I gloat, I know).


It's obvious what needed to go into my little heart was a creme brulee.  Though I'm not a terribly prolific baker, for some reason I've made more creme brulee than anyone I know.  My guess for why I have continually made it is that it turned out very well on my first attempt, therefore giving me encouragement and a somewhat false sense that the Creme Brulee Gods smile on me with approval.  With the glow of confidence, I blossom, and have turned out generations of perfectly creamy custards with the quintessential "Amelie" burnt sugar tops.


I use a recipe adapted from Joy of Cooking, which is one of the only cookbooks I own.  I add orange blossom water to brighten it and make it my own.  I decided for the occassion of the ramekin find I'd also play with a raspberry glaze.  It's easy, consistent and I tend to agree with Irma when she says it's "the most sumptuous we have ever tasted".


Recipe: Raspberry Glazed Creme Brulee (adapted from the Joy of Cooking)


What you need to get...

For the "creme"
2  cups heavy cream
3 large eggs
1/2 teaspoon vanilla
3/4 teaspoon orange blossom water (optional, but nice)
1/2 cup sugar

For the raspberry glaze
1 cup fresh or frozen raspberries
1/4 cup sugar plus enough to sprinkle over tops
The juice of 1/2 a lemon
Water to cover

What to do with it all...

  1. Heat cream until barely simmering, then remove from heat
  2. In a medium bowl, combine eggs and sugar, stir until just blended
  3. Pour in cream gradually in a steady stream while stirring the mixture
  4. Strain mixture thru a fine mesh sieve into a bowl with a pouring spout to remove some of the viscous whites
  5. Prepare a large pan with a shallow water bath and set 4 - 6 (count) eight ounce ramekins in it
  6. Divide cream mixture between the ramekins and place in oven
  7. Turn oven to 250 degrees farenheight and bake 1 - 1/2 hours or until custard is still a little quivery but set
  8. Remove and cool, then wrap and refridgerate for at least 8 hours
  9. During this time, prepare raspberry sauce by combining all ingredients except "sprinkling sugar) in a medium sauce pan and bring to a boil
  10. Cook on medium heat until water has taken on the color of the raspberries (about 5 minutes)
  11. Cool slightly and blend with immersion blender or food processor until smooth
  12. Set aside or store until custard is set
  13. Remove custard from refrigerator and spoon a thin, even layer of berry sauce on each
  14. Generously sprinkle an even layer of sugar on top of the berry sauce layer
  15. Fire up a hand torch, or your broiler and burn your sugar layer evenly until melted
  16. Allow to cool and turn smooth and glassy
  17. Serve!

Friday, February 5, 2010

Midweek Meals: Healthy Delicious Lima Bean Spread with Olives and Yogurt OR How Lima Beans Are Like Christopher Walken


Ok, so I'm posting a midweek meal on a Friday, bu it's been quite a busy week with school and the like and I wasn't able to post photos until today... sure, I could've posted the recipe on Wednesday, but without photos, lima beans are boring in most people's opinions (though I hope you will be forever changed on that after this) and just imagine what they'd be like without the pictures?  I would be a food blog pariah overnight!

After all that bashing of poor Mr. Lima, I think I should be fair to him and tell you there's more to him then smelly, shrivel-y/mush side dish afterthoughts.  The words LIMA BEANS make children collectively shudder and dive under kitchen tables around the globe, I have no doubt.  But the Lima has a bad rep for what really is a pretty amazing little legume: healthy, easy to cook and most importantly quite tasty when properly handled.  Problem is I don't think most people know what to do with them.

Kind of like Christopher Walken.  Amazing actor, right?  I know if I were a Hollywood director, I would be looking at him and thinking "Wow, this dude is freakin' amazing... but how the heck do I cast him?"  He can't play a down and out single father or run around the screen with a gun searching for the kidnapped Declaration of Independence, now can he?  His lines would take 5x as long to say, for one thing.


Just like Mr Walken, the lima bean can't just be thrown into a dish willy-nilly and without taking into consideration its special set of talents. For one, limas have a very nice rich/butter flavor and texture if they're not overcooked.  This recipe takes the lowly lima and puts him in the role he deserves: as a healthy, tasty and even elegant spread that makes a great midweek guilt-free snack!


Oh, and limas are full of fiber, magnesium and iron.  They're said to reduce cholesterol and even have a property that is supposed to "detoxify" bad sulfite preservitives (like in red wine).  The recipe also has garlic, yogurt and olive oil for added health points!


Recipe: Lima Bean Spread with Olives and Yogurt


What you need to get...

1 pound fresh or frozen lima beans (if fresh, blanch first in boiling water for 5 minutes)
2 cloves of garlic, minced
1 tablespoon dry Greek herb mix (dill, oregano, mint, rosemary)
1/4 cup plain yogurt (thick or Greek-style preferred)
10 pitted kalamata olives
1/4 cup olive oil
Salt to taste (won't need much)

What to do with it all...
  1. In a medium saucepan, heat olive oil on medium and add lima beans and herbs. 
  2. Saute until soft and very little color (about 5 mins)
  3. Add garlic and remove from heat - allow to cool slightly (don't let the garlic cook much, or it will get bitter)
  4. Using a slotted spoon, transfer lima bean mixture to a food processor (leaving the olive oil to add back later)
  5. Add olive and blend - pouring olive oil in a steady stream to incorporate - until mixture is spreadable but still a little chunky
  6. Fold in yogurt and serve with whole wheat bread or pita, crudites, or heck, toss with pasta or layer in a veggie lasagna!

Sunday, January 31, 2010

Cook your hobby: Scrabble cookies!


Recently there was  a cooking challenge over at the Chickenless Kitchen: Cook your hobby!  By that, she she meant that everyone should in some way cook something that represented in some way one of their other non-cooking hobbies.  I thought it was a great idea, and immediately thought of several options: cooking (wait, no, that didn't count)... reading!  Yes, that works!  Ah, but what then?  Make a bunch of book cupcakes?  Nope.  I needed something more interesting... How about mice racing?  Hmm... would be great if I actually did something like that, but since I just made it up I'm pretty sure I'd get called out pretty quickly.  Yeah, I could say photography, painting, travel and all the other hobbies easily found on survey checklists... but that's no fun, right... ? 


You know what IS fun?  Scrabble!  I decided to do Scrabble Cookies because I really do love Scrabble and Jason and I often talk friends into playing horrible mutant versions of the game for our amusement.  It's always good times.  Also, the idea of making rectangular cookies with letters on them seemed simple enough...

So I went to consult my trusty Joy of Cooking and found a nice recipe for a fourteen-in-one master cut out cookie recipe and adapted it to make: Wood Grain Orange Chocolate Cookies!  The wood grain was important to me as real scrabble tiles are wood and I've always loved that about them.  After finding a good way to achieve that, it's simply a matter of either piping on chocolate ganache for letters or using an edible marker (I tried the latter version on my "actual size" cookies since they were a bit small to manuever a piping bag around).  On a side note: I had tried another method for the letters involving mini alphabet cookie cutters that I sent away for specially, but it was a total, hilarious disaster.  I wish I'd taken a picture of the sad, slumpy & disfigured letters it produced.  Ah well, in the end it turned out good!

If you enjoy these cookies half as much as I enjoy Scrabble, my work here is done...


Recipe: Scrabble Cookies


For the Wood Grain Chocolate Orange Cookies (adapted from Joy of Cooking's Marble Cookies)...
2 1/2 cups AP flour
1/2 pound unsalted butter cut into 14 pieces, at room temperature (that's 2 sticks)
1 cup superfine sugar (you can also pulse granulated sugar in a food processor for 1 minute)
1/2 teaspoon table salt
1 large egg yolk
1 large egg
2 teaspoons vanilla
4 ounces melted semisweet baking chocolate
The zest of 1 orange

For the Letters...
For larger (2 inch high) cookies: 1 cup chocolate ganache, cooled slightly and added to a piping bag with a number 3 round pastry tip (you'll need a bar of semisweet baking chocolate and a pint of heavy cream for this - see "ganache" link for method)
OR
For "actual size" (2.5 cm high) cookies: Edible black marker

What to do with it all...
  1. On medium speed, mix butter, sugar and salt unti fluffy
  2. Add egg yolk, whole egg, zest and vanilla and mix until well blended
  3. Reduce speed to low and add flour slowly until well combined
  4. Divide dough half, wrap and refigerate unti firm - at least 1 hour and up to 2 days
  5. Preheat oven to 375 degree F and prepare 2 cookie sheets with parchment paper or Silpat
  6. On a well-floured surface, roll out your first round to a 14 inch thick then drizzle over half your melted chocolate
  7. Knead the dough loosely to incorporate the chocolate just so you see streaks in the dough
  8. Re-flour your surface and roll dough out to 1/8 inch thick
  9. Cut cookies to desired size using a ruler and a sharp knife: 2 inches by 1 1/4 inches for large cookies, 2.5 cm by 2 cm for "actual size" cookies"
  10. Repeat process with second dough half
  11. Place cookies on baking sheets, and place sheets into oven (one on lower rack, one on upper)
  12. Bake for 5 - 7 minutes, rotating sheets half way thru baking (watch closely for browning)
  13. Cook and decorate either with melted ganache, or edible marker (recommended for smaller cookies)
Makes approx 2 dozen large Scrabble cookies, or a whole boards' worth of the "actual size"!


On another note, I'd like to thank Nancy of wonderful Spicie Foodie and Kathy of the brilliant Colors of Indian Cooking for the Honest Scrap Award!  In accepting this award, I am supposed to list 10 honest things about myself, so here goes!

1.  My kitchen is a whopping 100 square feet (about 7 x 14), galley style, with practically no workable surface areas.  I sometimes pretend I am MacGuyver to invent ways to cook (I know lots of people have much smaller kitchens and I should not complain!)
2.  I've never met a piece of chocolate I didn't like
3.  I will choose a pickle over a cupcake on any day of the week
4.  I didn't not learn to swim until I was 20 due to a fear of water
5.  I secretly believe myself to be a queen of the thrift stores (with pride) for my ability to find amazing things in them
6.  As a child I was so sensitive to sugar that I once ran off and dislocated my own shoulder in a hyperactive flurry after inhaling a pudding cup that a friend of my parents' unwittingly gave me
7.  I have a dream to someday own goats
8.  My big toes point upwards a bit and give off the appearance of being snobbish
9.  Everyone in Chicago seems to love living by the lake, which I did once, and hated it passionately come Winter
10.  Though I am a born and bred Chicago girl, I prefer New York style pizza to Chicago deep dish... which is, of course, sacrilege...

Thanks again everyone!

LinkWithin

Related Posts with Thumbnails